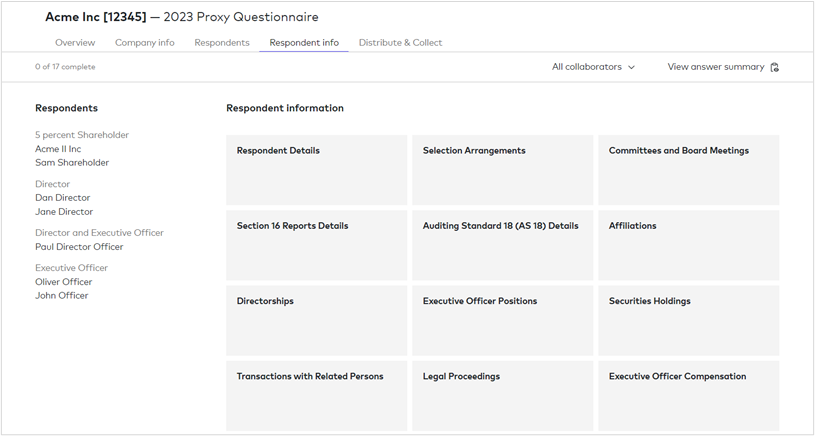
Once the Company info and Respondents tabs are all marked complete, the Respondent info tab will show a categorized list of respondents on the left and the cards associated with those respondents. The cards will also show the assigned Collaborator, if any, under the card heading. Click on the card listed on the right to view the information contained within:
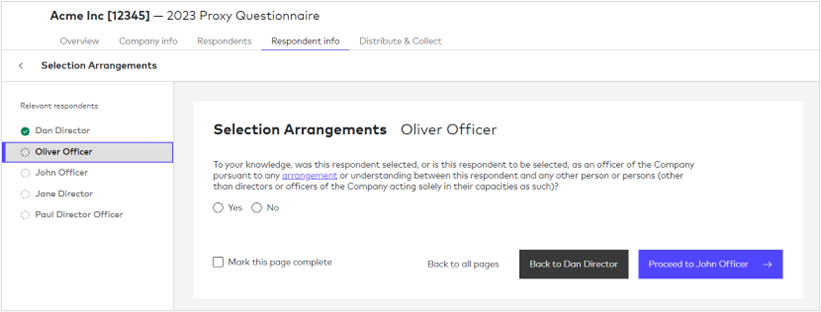
When clicking into a card, the navigation list will be on the left with only the relevant respondents and the form page will be on the right as follows:
Navigating the Respondent info pages
There are several ways you can navigate through the pages:
Navigation list – you can select the relevant respondent in the navigation list on the left to move through the respondent pages as required.
Navigation buttons – You can use the Back to or Proceed to buttons at the bottom of the page to move backwards and forwards through the other relevant respondent pages in sequence.
Card view – You can return to the Respondent info tab by either clicking on the Back to all pages at the bottom of the page or click on the back arrow next to the page title in the upper left corner.
Marking page complete
For each respondent, when the page is complete, click the Mark this page complete box at the bottom of the form for the respondent. There is no requirement to pre-fill any or all of information on these pages before marking a page complete, though the more information that is pre-filled the more efficient the process will be for respondents. A checkmark will appear next to the respondent’s name in the navigation list after the page is marked complete. Once all the respondent pages have been marked complete for the card, the card on the Respondent info tab will get a checkmark.
Exhibit file uploads
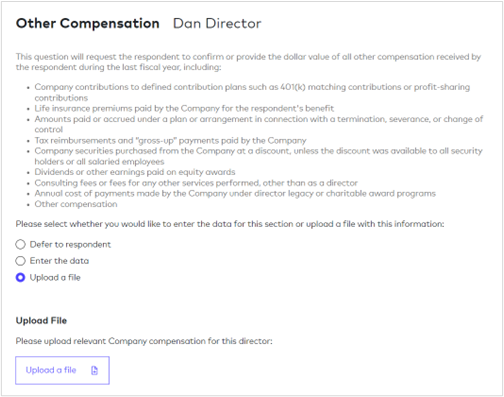
Some of the cards will contain a section with the following options:
Defer to the respondent – no questions need to be answered by the company; the respondent will answer the questions.
Enter the data – a series of boxes will appear to enter the relevant data.
Upload a File – a file with the required information may be uploaded in lieu of entering the data. When selecting Upload file, the following will appear:
The required file format to be uploaded can be a PDF, Word document, Excel worksheet or an image (.JPG, .PNG) and will need to be stored locally on your computer. The image can be one taken with your mobile device. Click on the Upload a file button and the following dialogue box will appear:
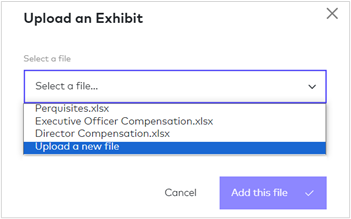
Select Upload a new file from the drop-down options, locate the file you wish to use, and the following dialogue box will appear:
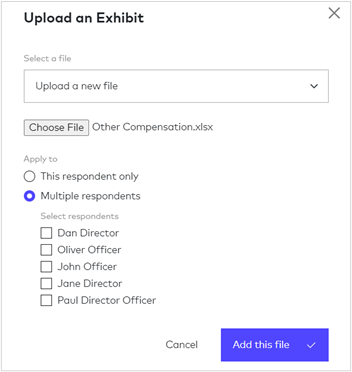
If the information applies only to this respondent, select This respondent only.
If the information applies to other Respondents, select Multiple respondents and select those respondents that the information has been provided for. You will need to go to each of these respondent pages and select the Upload a file option to see the file.
Note: You can remove the existing file by choosing a new file.
Select Add this file. This file will be added to the Respondent questionnaire as an exhibit.
Answer Summaries
On the Respondent info tab, in the top right-hand corner is an Answer Summary option. This will show all the respondent information that has been answered for each respondent:
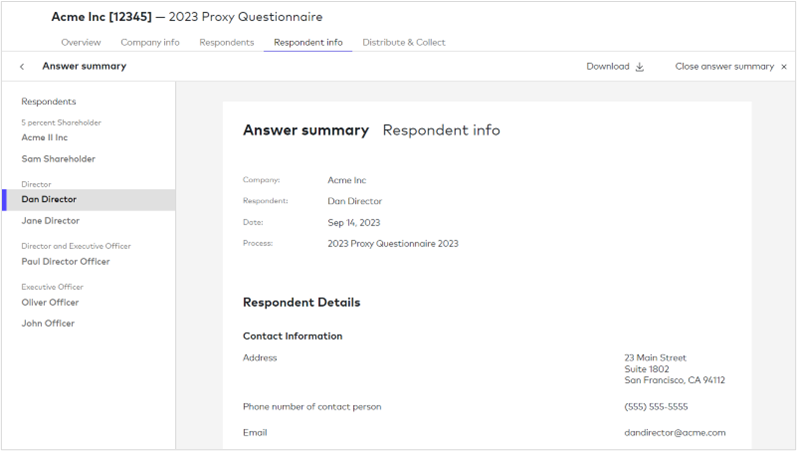
You will see Unknown for unanswered questions.
Note, there is a Download option available in the top right-hand corner of the screen.
To get back to the Respondent info tab, either click on the back arrow in the top left-hand corner or click on Close answer summary in the top right hand corner of the screen.
Note: Information on the Respondent info tab does not necessarily need to be completed before sending out the forms using Distribute and Collect.
Next step, completing the Distribute & Collect tab.
