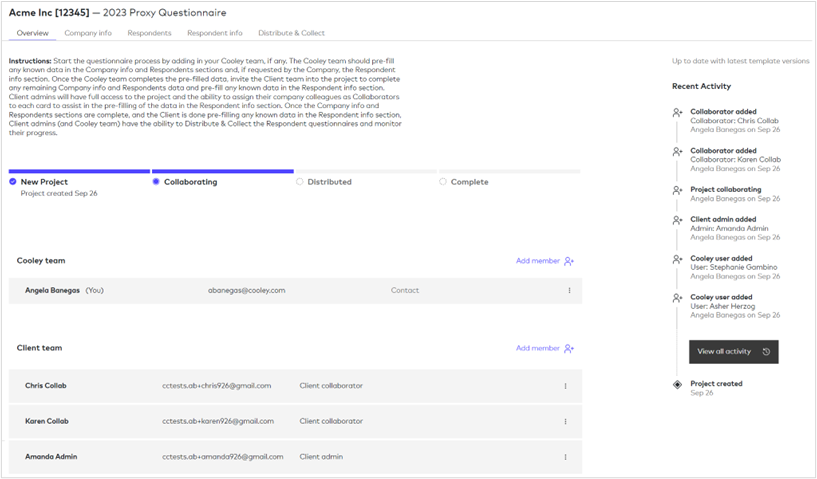
The Overview screen is a snapshot of the project’s progress and team members:

Status Bar – The status bar will update as the project progresses.
- New Project – this is the state while you are setting up the project and inviting Cooley team members to the project.
- Collaborating – this is the state when clients have been invited into the project. The status will move to Collaborating when at least one client admin has been added.
- Distributed – this is the state when questionnaires have been distributed to respondents. The status will move to Distributed when at least one respondent questionnaire is distributed.
- Complete – this is the state once all questionnaires have been completed. The status will move to the Complete when all respondent questionnaires have been signed and submitted.
Recent Activity – The activity column will show what activity has taken place on the project. Once the activity list includes more than six items, you will see the View all activity button. Click on the View all activity to see the complete activity list.
Adding a Cooley team member
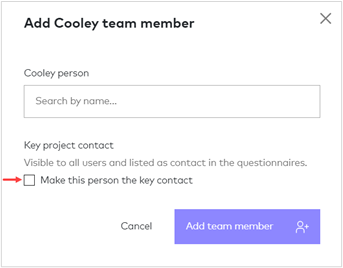
To add in other Cooley team members to the project, click on Add member to add more people to the list. This will send an email to that person, informing them that they have been added to the project and a link to access the platform.

Key contact – In the Add Cooley team member modal, there will be a tick box option to make the team member the Key Contact. The Key Contact will be visible to all users (Cooley, client and respondents), and will pre-populate this person’s name and contact information into the generated questionnaires. The Key Contact should be the Cooley attorney to whom questions regarding the process should be directed from the client and respondents.
You must designate a key contact before adding anyone to the Client team. The option to add Client team members will not be made available until you do.
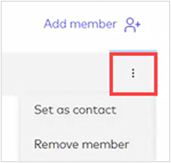
If the key contact changes, you can change the information by clicking on the Lookup button, found alongside the new key contact name, under Add member:

Set the new key contact as the “contact”. This will remove the key contact status from the current member and set the new key contact. The Cooley key contact cannot be changed once the questionnaires have been distributed. You can add only one Cooley key contact per project.
Remove member – you can remove the member from this project by clicking on the Lookup button and selecting remove member.
Adding a Client team member
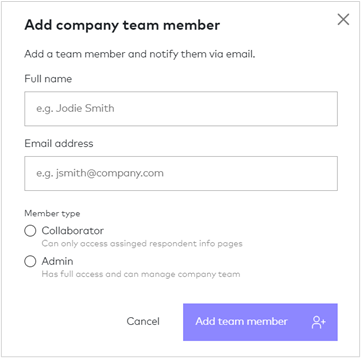
To add client team members to the project, click on Add member for the Client team. Complete the following dialogue box:

Complete the name and email information.
Note: Before inviting in anyone at the client, we suggest completing the basic information about the company requested in the Company Info tab, though this is not mandatory.
Member type:
Admin – this is someone at the client who will have full access and can manage all aspects of the questionnaire process and assign other admins and client collaborators to assist in the process. Client admins will be able to do everything that Cooley staff will be able to do, apart from creating a new project and adding Cooley team members. This should be the person at the client who will be most involved in the D&O questionnaire process.
Collaborator – this is someone at the client who will have knowledge of certain information and can help the admin complete certain Respondent info pages. For example, a person in Human Resources that keeps the records of Director and Executive Office benefits, or the Corporate Secretary that keeps track of the Board and Committee meeting dates and attendance. Collaborators will be restricted to the Overview tab and Respondent info tab where they will only see Respondent info pages that have been assigned to them, typically by the client admin.
Click on Add team member when done. This will send an email to that person, informing them that they have been added to the project and a link to access that project. The Client team will need to log in separately in order to access Cooley Connect.
Lookup option (three dots):
Clicking on the lookup button will open the following menu:

Edit member – you can change the member type.
Remove member – you can remove the member from this project.
Resend Invite – you can resend the invitation to the member.
Next step, completing the Company information tab.
